S-curve
Work in progress: This section is still a work in progress — content is being added and revised continuously.
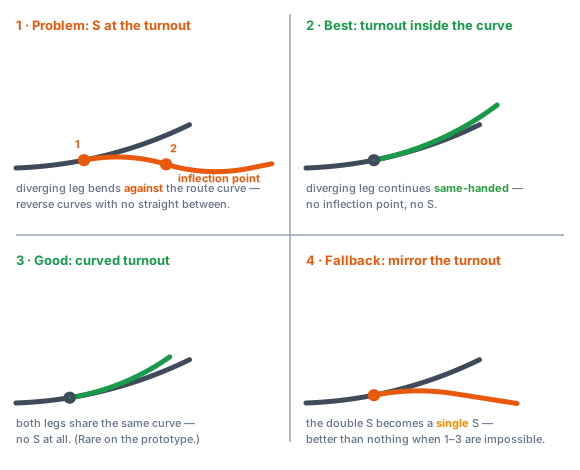
What is checked? Where two curves of opposite direction follow each other directly, the plan check verifies that a sufficient straight lies between them.
Why does it matter? In an S-curve the ends of two coupled cars swing out in opposite directions — the lateral offset at the coupler adds up, and close-coupling kinematics make it worse. The result: derailment or buffer locking, often only when pushing. Strictly speaking the governing quantity is bogie-pivot spacing plus twice the end overhang; car length is its safe approximation.
How bad is it? — the radius decides. The lateral offset at the coupler grows roughly with car length² ÷ radius: the tighter the radius, the more dangerous the S-curve. A broad reverse curve, by contrast, is harmless — main lines run them deliberately without an intermediate straight. The plan check therefore grades tight S-curves more strictly (error) than broad ones (warning, or no finding at all). At turnouts it reports at most a warning, and a broad reverse curve there not at all.
Where does it occur? Most often at turnouts — precisely where the route is already curving (passing siding, crossover). If a turnout diverges against the curve, route curve, turnout curve and correction curve line up into a double kink (“double S”). Because the inflection point sits right at the turnout, it is easy to miss.
How to fix it: On open track: a straight of at least one car length between the curves — or widen the curves (a larger radius defuses the S-curve). At turnouts there are more elegant routes that create no S at all (picture above):
- Place the turnout inside the curve — the diverging leg continues the curve in the same direction (prototypical).
- Use a curved turnout — both legs lie within the same curve (geometrically smoothest).
- Mirror the turnout (swap handedness) — turns the double S into at least a single S.
If an S remains, widening the tight reverse curve helps — often the turnout radius is not the problem (Piko A turnouts, for example, are ≈ 916 mm, i.e. broad); only the reverse curve added behind it is tight. Changing it to a broad radius defuses the S directly: the S does not disappear, but it becomes harmless. That is why this route is not in the list above — the list only counts the three routes that leave no S at all.
At symmetrical turnouts the routes that depend on handedness or on a curved version do not apply. A double-slip switch and a Y turnout (symmetrical turnout) have no handedness — there is no mirrored counterpart, and no curved version of them exists either. That leaves exactly two routes: widen the reverse curve, or insert a straight. The Trackplanner therefore shows its own notice at these pieces and offers only those two kinds of suggestion.
Numbers & defaults: intermediate straight ≥ the longest car of your trains (240 mm without your own trains; H0, scaled). On open track the calculated lateral offset at the coupler decides: a warning from 11 mm, an error from 15 mm (H0, scaled). At turnouts a tightest radius of 600 mm or more (H0, scaled) counts as broad and is not reported; below that the finding is a warning on through main tracks and only a notice on storage tracks — never an error.